A blog to share printable sewing patterns created by me - an ex professional pattern maker who turned indie.


(Scroll down to the end of the post for download links)
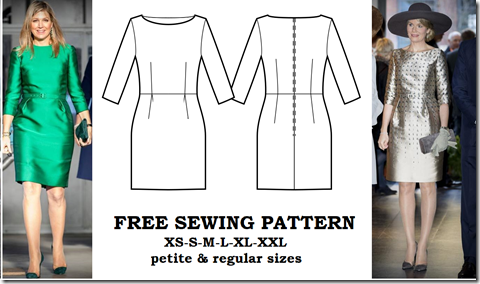
The pattern today is inspired by many dresses worn by Queen Maxima of the Netherlands – a fashion icon that I really love, much more than the skinny Kate Middleton. It features a bateau neckline, 3/4 sleeves and just above the knee length – simple, modest and elegant huh? This dress is suitable for almost any settings that you need to dress up a bit – for a wedding, a dinner date or a professional meeting. Do you want to look like an elegant royal? I do. And the result is that I have lots of this style in my closet :)
This pattern is a regular fitting one, with added eases as shown in the table below:
Ease around bust | 9.00 cm | 3.54 in |
Ease around waist | 12.00 cm | 4.72 in |
Ease around hips | 10.50 cm | 4.09 in |
Ease around full hips | 7.00 cm | 2.76 in |
Ease around overarm | 12.00 cm | 4.72 in |
Ease around wrist | 12.00 cm | 4.72 in |
The pattern is created in pdf format using A4 paper. I can also create the pattern in other paper sizes (A0 to A4, Letter, Tabloid), so please inform me if you need them.
Print the patterns on A4 paper at actual size/no scaling/100%. Not sure how to print and cut the patterns? Check the guide here.
Do you want to add side seam pockets to the pattern for additional convenience? Just go ahead because it is too easy, just follow the quick instruction here.
Again, happy sewing! I look forward to seeing your masterpiece!
XOXO
Tiên the Little Sewist
Cutting instruction:
After taping down all the pages following the instruction, the overall layout of the pattern pieces is much like this (the arrangement of pattern pieces will vary a bit with sizes because I want to utilize all space to result in least number of pages):
The cutting instruction is for the garment with facings. If you choose to sew it with bias binding, skip the front facing and back facing pieces. If you choose to sew with bodice lining, skip the facing pieces and cut a set of front and back pieces in lining fabric.
A. Front Skirt - 1pcs
B. Back Skirt - 2pcs
C. Sleeve - 2pcs
D. Front - 1pcs
E. Back - 2pcs
F. Front Facing – 1pcs + Fusible Interfacing – 1pcs
G. Back Facing – 2pcs + Fusible Interfacing – 2pcs
Download links for the dress:
Check for your size in the Size Chart before downloading. Not finding your size? Comment your height, bust – waist – hip measurements in the comment box below and I will send you the custom-made pattern for you as soon as I can!
The dress pattern I share in this post has a straight skirt. If you prefer a pencil design, narrow down the side seams, starting from the fullest part of the hip (marked with notches) down to hemline. It is a really quick modification, mark a point at the hemline at the desired width of skirt hemline and draw a straight line from the hip notch to the marked point. Then redraw the seam allowance and cut the pieces. It is similar to the demonstration below – the red lines are new side lines, the blue lines are new seam allowance lines.
(Scroll down to the end of the post for download links)
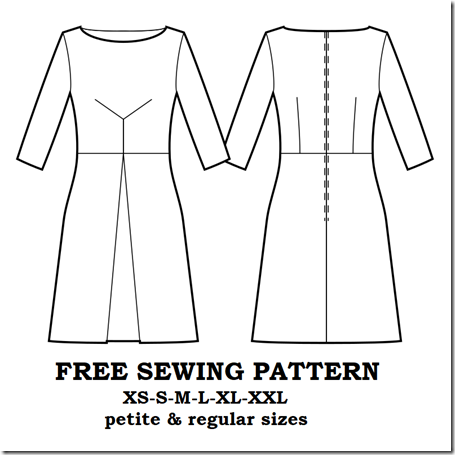
The dress today features a bateau neckline, 3/4 sleeves, A line skirt with center front box pleat and below the knee length. The front bodice darts have been moved to make a Y shaped detail to add some structure to the whole look. This is a modest design that is suitable for almost any kinds of occasion – from work to dinner date. Feel free to use any fabric you like, because each will give you a different delight.
I personally love the A line skirts, because it helps hide my narrow hips and balance with the heavy top while not undermining my height (you know I’m short, just 1.55m). It is also great when you make it with flowy fabric – imagine how it moves when you walk, so feminine and sweet! I have quite some simple A line skirt dresses, so this time I am adding a center front pleat. Although it will not affect much if you sew the dress with prints, but if you sew the dress with solid color, it will become a nice detail.
As usual, the dress pattern is created in pdf format using A4 paper. I can also create the pattern in other paper sizes (A0 to A4, Letter, Tabloid), so please inform me if you need them.
Print the patterns on A4 paper at actual size/no scaling/100%. Not sure how to print and cut the patterns? Check the guide here.
Do you want to add side seam pockets to the pattern for additional convenience? Just go ahead because it is too easy, just follow the quick instruction here.
Again, happy sewing! I look forward to seeing your masterpiece!
XOXO
Tiên the Little Sewist
Cutting instruction:
The cutting instruction is for the garment with facings. If you choose to sew it with bias binding, skip the front facing and back facing pieces. If you choose to sew with bodice lining, skip the facing pieces and cut a set of front and back pieces in lining fabric.
A. Front Skirt - 1pcs
B. Back Skirt - 2pcs
C. Sleeve - 2pcs
D. Front - 1pcs
E. Back - 2pcs
F. Front Facing – 1pcs + Fusible Interfacing – 1pcs
G. Back Facing – 2pcs + Fusible Interfacing – 2pcs
Download links for the dress:
Check for your size in the Size Chart before downloading. Not finding your size? Comment your height, bust – waist – hip measurements in the comment box below and I will send you the custom-made pattern for you as soon as I can!
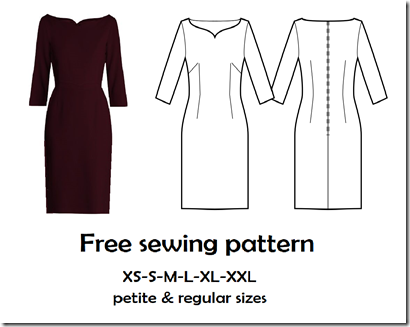
Ahhh, I am in love with this beautiful sweetheart bateau neckline as soon as I stumbled upon this design by Goat Fashion on Pinterest. I decided to make myself one, and this is the pattern that came along with the pattern for myself. Hope you will enjoy it!
This dress has a sweetheart bateau neckline, below the knee length and 3/4 sleeves. I must say it is a formal meeting ready dress. Just put this dress on, choose a matching hat, and you can even go to the Royal Ascot! Of course, it is also quite moderate, so you can be confident to wear it to work or a professional meeting.
The dress pattern I share in this post has a straight skirt. If you prefer a pencil design, narrow down the side seams, starting from the fullest part of the hip (marked with notches) down to hemline. It is a really quick modification, mark a point at the hemline at the desired width of skirt hemline and draw a straight line from the hip notch to the marked point. Then redraw the seam allowance and cut the pieces. It is similar to the demonstration below – the red lines are new side lines, the blue lines are new seam allowance lines.
And if you find the length of the dress unflattering, just feel free to lengthen or shorten it to your taste. It’s always worthy to try.
The pattern is created in pdf format using A4 paper. I can also create the pattern in other paper sizes (A0 to A4, Letter, Tabloid), so please inform me if you need them. Print the patterns on A4 paper at actual size/no scaling/100%. Not sure how to print and cut the patterns? Check the guide here.
Do you want to add side seam pockets to the pattern for additional convenience? Just go ahead because it is too easy, just follow the quick instruction here.
Again, happy sewing! I look forward to seeing your masterpiece!
XOXO
Tiên the Little Sewist
Cutting instruction:
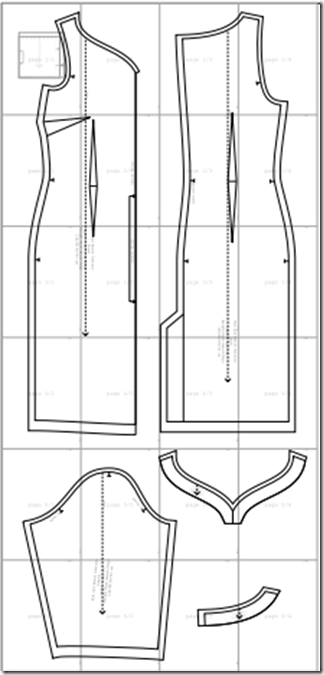
After taping down all the pages following the instruction, the overall layout of the pattern pieces is much like this (the arrangement of pattern pieces will vary a bit with sizes because I want to utilize all space to result in least number of pages):
The cutting instruction is for the garment with facings. If you choose to sew with bodice lining, skip the facing pieces and cut a set of front and back pieces in lining fabric instead.
A. Front - 1pcs
B. Back - 2pcs
C. Sleeve - 2pcs
D. Front Facing – 1pcs + Fusible Interfacing – 1pcs
E. Back Facing – 2pcs + Fusible Interfacing – 2pcs
Download links for the dress:
Check for your size in the Size Chart before downloading. Not finding your size? Comment your height, bust – waist – hip measurements in the comment box below and I will send you the custom-made pattern for you as soon as I can!
Hi all,
It’s been quite some time since I started this blog to share free sewing patterns, and I feel so happy to see more and more visitors from all over the world coming to my blog. I do not know if you find your favorite patterns here or not, but I hope at least you find some inspirations and ideas for your next projects. I also hope to interact with you if possible – so please contact me if you share the same interest with me.
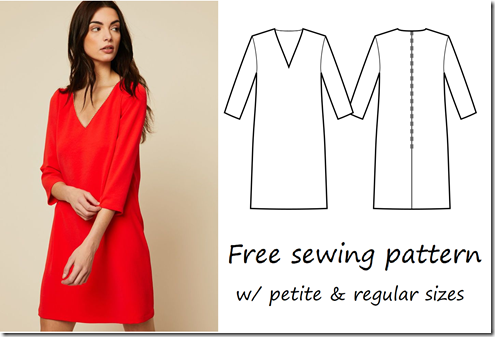
Today I am sharing yet another simple dress pattern – the V neck tunic dress. We all love comfortable clothing, don’t we? I am no exception, and that’s why I love sewing myself tunics. I have a mini collection of tunics in my wardrobe in all kind of colors and prints, and with only variations in neckline shapes and the length of sleeves – and I still love to have more! A few months ago, I already shared the pattern for the slit neck tunic dress (aka. the classic tunic dress pattern, you can find it here), and I am now sharing the newest tunic I just added to my collection.
This tunic dress is super easy to sew – just like any other tunic which are made up of just a few pieces of fabric, but it has a deep V neckline to upgrade it to a sexy dress. Of course, if you choose a stretchy knit fabric, you need to pay extra attention not to make the neckline gaping. Fusible will be your best friend here.
I made this pattern with a zipper at the back of the dress, but if you are not into sewing zippers, just cut the back dress on fold and sew the two pieces together. The zipper should be saved for more sophisticated dresses. And if you want your dress to look more like the expensive hi-end fashion ones, add an invisible zipper. You can even add an exposed metal zipper for statement.
The pattern is created in pdf format using A4 paper. I can also create the pattern in other paper sizes (A0 to A4, Letter, Tabloid), so please inform me if you need them.
Not sure how to print and cut the patterns? Check the guide here.
Again, happy sewing! I look forward to seeing your masterpiece!
XOXO
Tiên the Little Sewist
The dress is made up of just a few simple pieces:
A. Front - 1pcs
B. Back – 2pcs (if you insert zipper)/ 1pcs (if you cut the back piece on fold)
C. Sleeve - 2pcs
D. Front Facing - 1pcs
E. Back Facing - 2pcs
Download links for the V neck tunic dress:
Check for your size in the Size Chart before downloading. Not finding your size? Comment your height, bust – waist – hip measurements in the comment box below and I will send you the custom-made pattern for you!
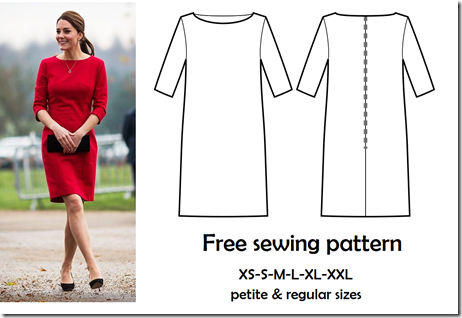
This is yet another easy one to sew and will result in a nice looking garment. You see how Kate Middleton wear it to an event? You can also do that! This boat neck half sleeve tunic dress is made to give you comfort even when you are attending a not-so-serious professional meeting. And it is versatile, you can wear it to almost everywhere you can think of – just mix it with appropriate accessories!
I really like how Kate mix this red dress with simple accessories: a small pendant, black purse, black heels and a pony tail. She looks effortlessly stylish and so comfortable. And I have learned a lesson by watching the royals: keep it simple. You will look much more elegant with nicely done hair and light makeup than dressing in complicating layers with messy hair and a carefully made up face.
The pattern is created in pdf format using A4 paper. I can also create the pattern in other paper sizes (A0 to A4, Letter, Tabloid), so please inform me if you need them.
Print the patterns on A4 paper at actual size/no scaling/100%. Not sure how to print and cut the patterns? Check the guide here.
Do you want to add side seam pockets to the pattern for additional convenience? Just go ahead because it is too easy, just follow the quick instruction here.
Again, happy sewing! I look forward to seeing your masterpiece!
XOXO
Tiên the Little Sewist
Cutting instruction:
After taping down all the pages following the instruction, the overall layout of the pattern pieces is much like this (the arrangement of pattern pieces will vary a bit with sizes because I want to utilize all space to result in least number of pages):
The cutting instruction is for the garment with facings. If you choose to sew it with bias binding, skip the front facing and back facing pieces. If you choose to sew with bodice lining, skip the facing pieces and cut a set of front and back pieces in lining fabric.
A. Front - 1pcs
B. Back - 2pcs
C. Sleeve - 2pcs
D. Front Facing - 1pcs
E. Back Facing - 2pcs
Download links for the dress:
Check for your size in the Size Chart before downloading. Not finding your size? Comment your height, bust – waist – hip measurements in the comment box below and I will send you the custom-made pattern for you as soon as I can!