Showing posts with label above the knee length. Show all posts

Saturday, May 23, 2020

Free PDF sewing pattern: Minju ruffled paneled dress

I am having a style crush on this beauty – a Ruffled Paneled Mini Dress by Minju Kim, a Korean fashion designer. It is a dress in her Spring-Summer 2020 collection. Look how playful it is with contrast yoke and a ruffled flounce back!

I am sharing this newly made pattern inspired by Kim’s design – the Minju ruffled paneled mini dress.
This dress features an slightly above the knee length (I just lengthen it a bit in comparison to the original dress – I know many of you do not want to show off too much legs, of course, if you want it short, just cut off some from the hem). The yoke is made with contrast color. You can experiment with mixing different color combos, or some embroidery decorations – and see how beautiful it may turn out to be.
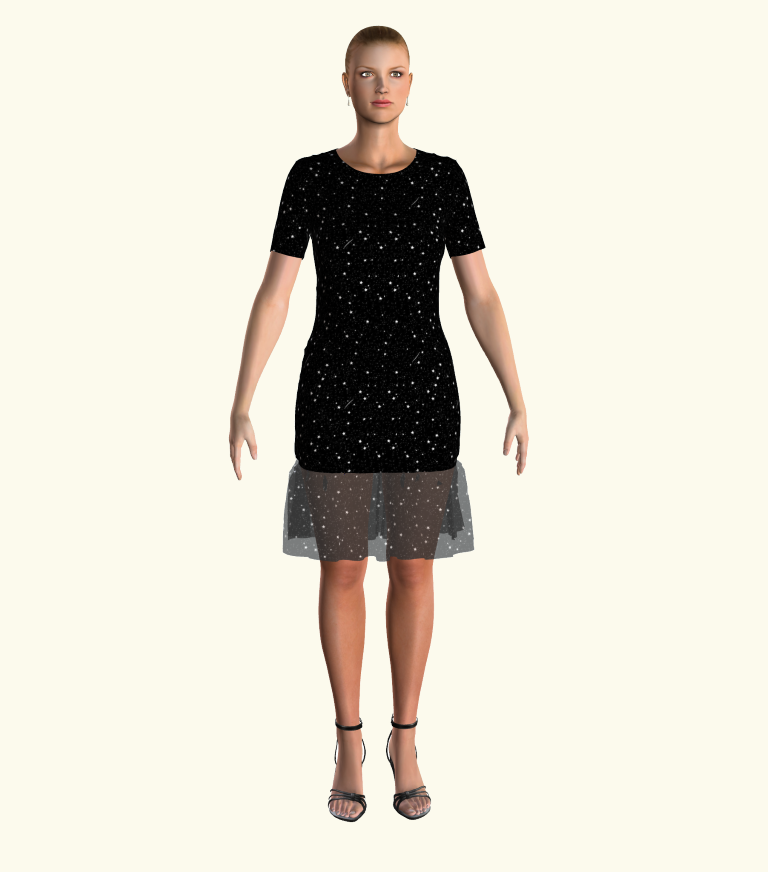
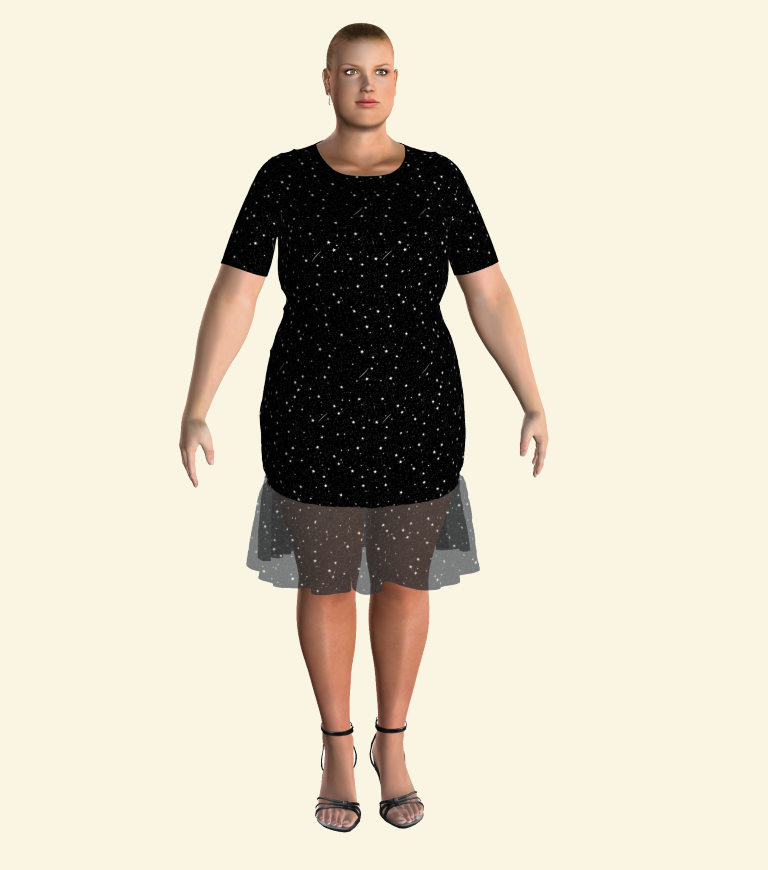
Below are just some examples of the Minju dress in 3D simulation:


And here’s another color option:


Do you think that this lovely darling is worth a try? Pick up your scissors and start cutting!
The pattern is made using layered PDF, please check for your desired size before printing so you won’t waste your paper. If you still do not know how to print a layered PDF, please check for the instruction here.
You can print this using your home printer and A4/Letter paper. I calculated the printing area so that you will be able to use either type of paper to print the pattern out perfectly. Always print the first page first and check with the test square if you are printing at the right scale before you print out the whole pattern.
Some PC may print smaller than actual size even when you choose 100% scale – I don’t know why this problem exist, but my HP laptop cannot print true to size. I have to scale up to 103% to get the right size. You may need to check with your PC to see if it prints true to size, if not, scale up a bit.
Cutting instruction:
After taping down all the pages following the instruction, the overall layout of the pattern pieces is like this (I chose size L as sample):

The pattern pieces are to be cut as follows:
A. Main Front – cut 1 on fold
B. Front Yoke – cut 1 on fold
C. Main Back – cut 2
D. Back Ruffle – cut 1 on fold
E. Front facing – 1 piece main fabric + 1 piece fusible interfacing
F. Back facing – cut 2 pieces main fabric + 2 pieces fusible interfacing
For sewing instruction and pattern download, visit my official website: http://tianascloset.com/index.php/2020/05/23/free-sewing-pattern-minju-mini-dress/

Tuesday, October 8, 2019

Lisa scalloped hem skirt pattern

I think I may be too into making skirt patterns – it’s the second skirt this month, and I feel so happy with it.
The scalloped hem has always been a beautiful addition to almost any item, from skirt, coat, top or dress, and although it may take you some extra time and attention when sewing this kind of hemline, it is totally worthy.
The Lisa scalloped hem skirt features a fitted upper skirt, and the gathered lower skirt with scalloped hemline. It falls just above the knee, and can be mixed with various types of tops.
I have made some 3D simulations about this beautiful skirt to help you imagine how it will turn out in real life:
And how will it look like on the body? I mixed it with the Celine crop top that I made a while ago. Maybe I will repost this beautiful crop top on this page. It’s just too stylish!
Here’s the side and back view. I love you the skirt hugs the hips and flare at the bottom.
For pattern and sewing instruction, visit my official website: https://tianascloset.com/index.php/2019/10/09/lisa-scalloped-hem-skirt-pattern/

Monday, September 23, 2019

The Lynn dress pattern

Hi guys,
After a long hiatus, I am back! I was so busy with my personal issues that kept coming one after one. I was really impatient because I could not sit in front of my computer and do my favorite activity of drafting patterns.
Today I just finished drafting and simulating the Lynn dress in the September collection. This is the sketch:
I decided that I will make this dress with stretch fabric to make it a friendly project for new sewists. It does not have waist or bust darts, and it hugs the body pretty closely.
Let’s see how it turns out on 3D models. This is it on a size M model:
And this is the Lynn dress on size 5XL model. OK, I must admit that I prefer curvy women and most of the time I think my dresses look better on them 🙂
Here is the link to the dress pattern on my official website Tiana's Closet: Lynn dress pattern
Happy sewing!
Tiana

Wednesday, August 14, 2019

Free sewing pattern: Chiara puffed sleeve mini dress


I just found out a piece of dress that I really like: a hot pink Chiara Boni dress. It features a simple A line silhouette - but has puffed lace sleeve to make it look special. So I think I will make one for myself - and I share it with you today. 

It is really easy to make, and the result? Just look how nice it is in the lookbook:


And here is my version of the dress - in 3D simulation:


What do you think about this? Nice for a day out, right?

The pattern is made using layered PDF, please check for your size before printing so you won’t waste your paper. If you still do not know how to print a layered PDF, please check for the instruction here. You can print this using your home printer and A4/Letter paper. I calculated the printing area so that you will be able to use either type of paper to print the pattern out perfectly. Always print the first page first and check with the test square if you are printing at the right scale before you print out the whole pattern.

Do you want to add side seam pockets to the pattern for additional convenience? Just go ahead because it is too easy, just follow the quick instruction here.

Cutting instruction:

After taping down all the pages following the instruction, the overall layout of the pattern pieces is like this (this is how it looks when you print all sizes - choose just your size for a less messy look):


The cutting instruction is for the garment with facings. If you choose to sew it with bias binding, skip the front facing and back facing pieces. If you choose to sew with bodice lining, skip the facing pieces and cut a set of front and back pieces in lining fabric.

A. Front - 1pcs
B. Back - 2pcs
C. Sleeve - Upper Part - 2pcs
D. Sleeve - Lower Part - 2pcs
E. Cuff - 2pcs
F. Front Facing – 1pcs + Fusible Interfacing – 1pcs
G. Back Facing – 1pcs + Fusible Interfacing – 1pcs

This is the link to download this pattern: Chiara puffed sleeve mini dress (size XXS - XXL)

Happy sewing!
Tien the Little Sewist

Tuesday, July 16, 2019

Free sewing pattern: Veronica dress

Hi guys,

I guess I should name my patterns, because I just find out that if I just list the features of the garment (like short sleeve, round neck, knee length, etc.), some of them will be really long, or will cause confusion with the same name for different model. So from now on, you will see the pattern with a name, I just name them randomly to my liking.

And the first dress with a name I am sharing today is the Veronica dress.

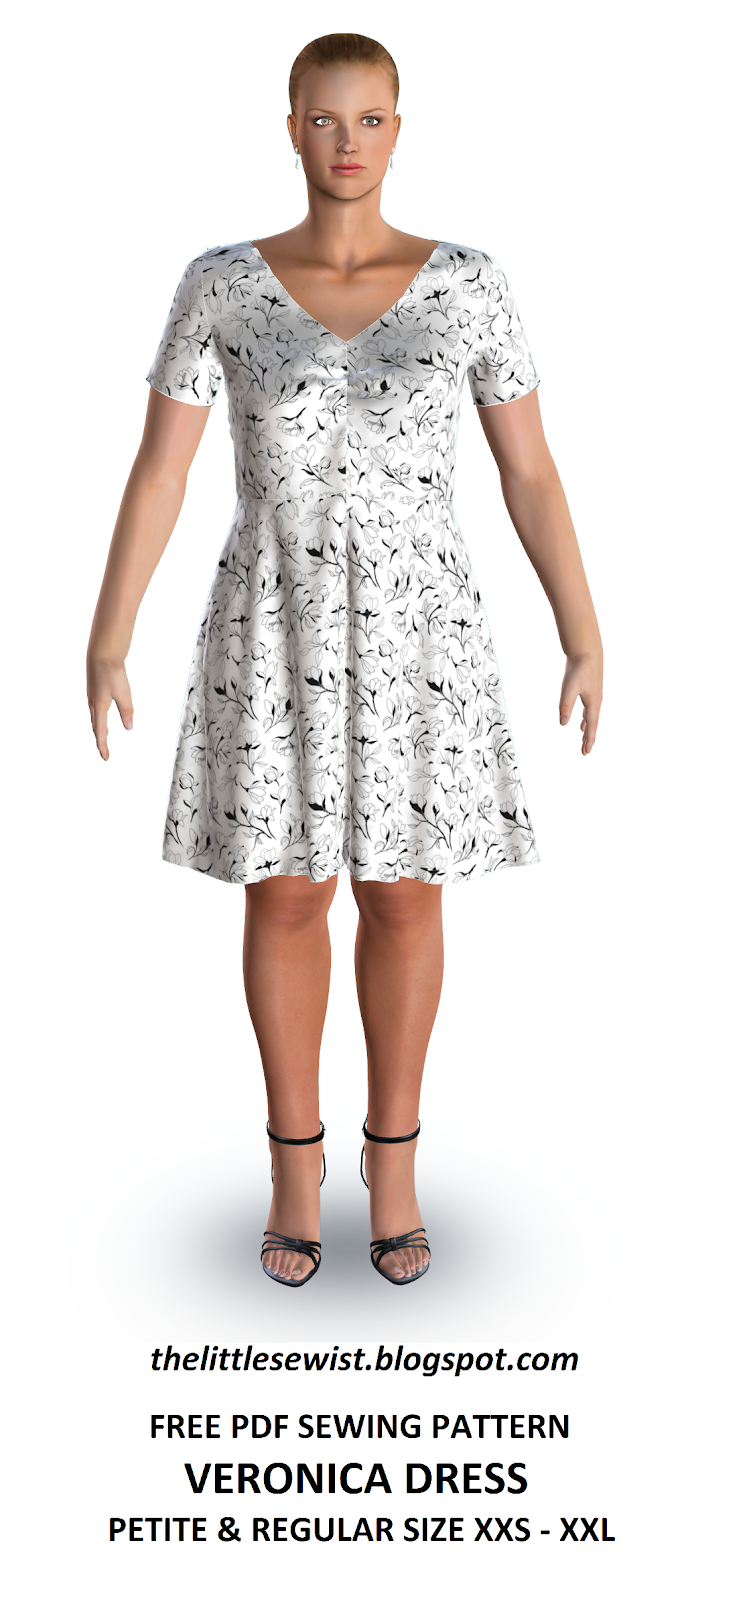
This dress features a deep V neckline, a gathered front, and a flared skirt. It is simple and easy, and it will make you beautiful I'm sure. 

Here is a 3D simulation of the Veronica dress:


 And this is how it looks on a size M model. 

And this is how it looks on a size XXL model. Still adorable, huh? I really love how the fit and flare form flatters the curves of the wearer, no matter what their body shape is.
The pattern is made using layered PDF, please check for your size before printing so you won’t waste your paper. If you still do not know how to print a layered PDF, please check for the instruction here.
You can print this using your home printer and A4/Letter paper. I calculated the printing area so that you will be able to use either type of paper to print the pattern out perfectly. Always print the first page first and check with the test square if you are printing at the right scale before you print out the whole pattern.

Do you want to add side seam pockets to the pattern for additional convenience? Just go ahead because it is too easy, just follow the quick instruction here.

Cutting instruction:

This is how you will get if you print all sizes. Messy, huh? Just print what you need, you won't get confused.


The cutting instruction is for the garment with facings. If you choose to sew it with bias binding, skip the front facing and back facing pieces. If you choose to sew with bodice lining, skip the facing pieces and cut a set of front and back pieces in lining fabric.

A. Front - 2pcs
B. Back - 2pcs
C. Front Skirt - 1pcs
D. Back Skirt - 2pcs
E. Front Facing – 1pcs + Fusible Interfacing – 1pcs
F. Back Facing – 2pcs + Fusible Interfacing – 2pcs


Happy sewing! Remember to show me your masterpiece!

XOXO
Tien the Little Sewist

Monday, July 15, 2019

Free sewing pattern: Half sleeve drop waist dress


I am sharing the pattern for the drop waist dress that I made 3D simulation yesterday. I am going to print it and sew it, so just wait for my dress in real life!

This dress features a loose fit, an over the knee length, a round neck and half sleeves. It is simple and yet still elegant enough for a work day or a date night. Make it with soft flowy fabric for a flirty feminine feel.


For the sake of making it as simple as possible for newbies, I discarded the back zipper. If you want to add a back zipper, add a 1.5 centimeters or 5/8 inch seam allowance to the back piece and cut 2 of them.

The pattern is made using layered PDF, please check for your size before printing so you won’t waste your paper. If you still do not know how to print a layered PDF, please check for the instruction here.

You can print this using your home printer and A4/Letter paper. I calculated the printing area so that you will be able to use either type of paper to print the pattern out perfectly. Always print the first page first and check with the test square if you are printing at the right scale before you print out the whole pattern.

Do you want to add side seam pockets to the pattern for additional convenience? Just go ahead because it is too easy, just follow the quick instruction here.

Cutting instruction:

After taping down all the pages following the instruction, the overall layout of the pattern pieces is like this:


The cutting instruction is for the garment with facings. If you choose to sew it with bias binding, skip the front facing and back facing pieces. If you choose to sew with bodice lining, skip the facing pieces and cut a set of front and back pieces in lining fabric.

A. Front - 1pcs
B. Back - 1pcs
C. Front Flounce - 1pcs
D. Back Flounce - 1pcs
E. Front Facing – 1pcs + Fusible Interfacing – 1pcs
F. Back Facing – 1pcs + Fusible Interfacing – 1pcs

This is the link to download this pattern: Half sleeve drop waist dress (size XXS - XXL)

Happy sewing!
Tien the Little Sewist

Saturday, July 6, 2019

A little twist to the drop waist dress

Hi friends,

I got a bit carried away and played around with the pattern for the drop waist dress that I shared a few days ago. I changed the neckline to V shape, and made a tiered flounce. It turned out quite nice and I was so happy with it. I even spent some time to turn it into a printable PDF pattern!

This is how it looks from front and back. It's simple and has a flirty feel because of the layered hem, and I believe if you make it in soft, flowy fabric, you will have a nice dress for a day out.


And this is a 360 degree view. I made this GIF image but the quality is quite low :(


Do you feel that this is nice? Tell me how you think of it!

I am sharing the pattern here just in case you need it. You can easily modify the pattern for the drop waist that has been shared previously to get this pattern.

Again, this pattern is made in layered PDF, check how to print out your size in this instruction and remember to check for your size before printing.

This is how it looks when I printed just size L and taped all pages together:


Happy sewing,
Tien the Little Sewist

Wednesday, July 3, 2019

Free PDF sewing pattern: Sleeveless drop waist dress

In this post I am sharing the pattern for the summery sleeveless drop waist dress that I have introduced in the previous post.


A week ago, I came across an article about creating and printing layered PDF files, and it comes to my mind that I can also create such files to make my patterns clearer and easier to use for my readers. And this is my first pattern created using layered PDF format.

Because I am using layered PDF format, I add a lot of details into the pattern, so if you open the file with all layers displayed, you will see very messy pages with a lot of lines and dots and colors. I bet you will be confused if you print all layers out. Don't worry, just follow the steps to print out a layered PDF, and you will thank technology for creating such wonderful and convenient file format.

There is also some small changes in the patterns. If you print out your size (for example, size M), you will see that there are both cutting lines and sewing lines. I have seen many newbies complaining that they do not know how to determine seam allowance in a pattern that only has cutting lines or sewing lines. In order to help, I am adding both sewing lines and cutting lines into the pattern, and if you print the pattern out, you will see them both. The inner lines are sewing lines, and the outer lines are cutting lines. If you want to sew exactly like how the pattern is created, just cut along the cutting lines. If you want to make some alterations to the pattern, use the sewing lines.

Normally, I create patterns for both regular and petite sizes, but this dress is quite simple and have no waistline defined, and you can wear it a bit long or short. So, there is only one pattern for the dress.

After printing and taping together all pages, you will get a pattern like this (I just print one size only):


OK, that's some improvements that I made to my patterns, and here is the link to download: the Sleeveless drop waist dress (size XXS - XXL).

Please check for your size in the size chart before printing. This pattern can be printed on both A4 and Letter sized paper.

Happy sewing!
Tien the Little Sewist

Thursday, August 23, 2018

Dressing like a royal: 3/4 sleeve boat neck sheath dress pattern

(Scroll down to the end of the post for download links)

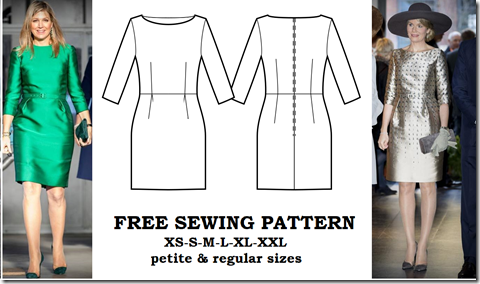
The pattern today is inspired by many dresses worn by Queen Maxima of the Netherlands – a fashion icon that I really love, much more than the skinny Kate Middleton. It features a bateau neckline, 3/4 sleeves and just above the knee length – simple, modest and elegant huh? This dress is suitable for almost any settings that you need to dress up a bit – for a wedding, a dinner date or a professional meeting. Do you want to look like an elegant royal? I do. And the result is that I have lots of this style in my closet :)

image

This pattern is a regular fitting one, with added eases as shown in the table below:

Ease around bust

9.00 cm

3.54 in

Ease around waist

12.00 cm

4.72 in

Ease around hips

10.50 cm

4.09 in

Ease around full hips

7.00 cm

2.76 in

Ease around overarm

12.00 cm

4.72 in

Ease around wrist

12.00 cm

4.72 in

The pattern is created in pdf format using A4 paper. I can also create the pattern in other paper sizes (A0 to A4, Letter, Tabloid), so please inform me if you need them.

Print the patterns on A4 paper at actual size/no scaling/100%. Not sure how to print and cut the patterns? Check the guide here.

Do you want to add side seam pockets to the pattern for additional convenience? Just go ahead because it is too easy, just follow the quick instruction here.

Again, happy sewing! I look forward to seeing your masterpiece!

XOXO

Tiên the Little Sewist

Cutting instruction:

After taping down all the pages following the instruction, the overall layout of the pattern pieces is much like this (the arrangement of pattern pieces will vary a bit with sizes because I want to utilize all space to result in least number of pages):

The cutting instruction is for the garment with facings. If you choose to sew it with bias binding, skip the front facing and back facing pieces. If you choose to sew with bodice lining, skip the facing pieces and cut a set of front and back pieces in lining fabric.

A. Front Skirt - 1pcs

B. Back Skirt - 2pcs

C. Sleeve - 2pcs

D. Front - 1pcs

E. Back - 2pcs

F. Front Facing – 1pcs + Fusible Interfacing – 1pcs

G. Back Facing – 2pcs + Fusible Interfacing – 2pcs

Download links for the dress:

Check for your size in the Size Chart before downloading. Not finding your size? Comment your height, bust – waist – hip measurements in the comment box below and I will send you the custom-made pattern for you as soon as I can!

The dress pattern I share in this post has a straight skirt. If you prefer a pencil design, narrow down the side seams, starting from the fullest part of the hip (marked with notches) down to hemline. It is a really quick modification, mark a point at the hemline at the desired width of skirt hemline and draw a straight line from the hip notch to the marked point. Then redraw the seam allowance and cut the pieces. It is similar to the demonstration below – the red lines are new side lines, the blue lines are new seam allowance lines.

image

Tuesday, August 7, 2018

Simple A line dress

(Scroll down to the end of the post for download links)

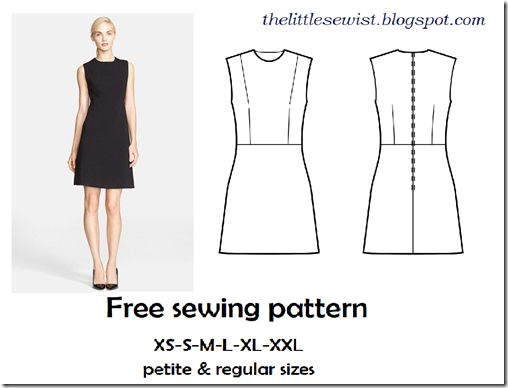
Do you think this little black dress is cute? I am in love with this simple and sleek design, and decided to share this pattern with you. This dress features a tight round neckline, above the knee length and sleeveless design. And I think that even when you make this dress with different colors and prints, it will still be a nice and simple piece to choose when you are tired of opening the full wardrobe and finding it hard to choose what to wear.

image

I made myself a little black dress with this pattern, and I chose to make it with bodice lining instead of facing. I always think that using lining makes the dress more high-class, just like how the high end fashion brands always do with their designs.

You will find sewing with lining takes you just a little more time than sewing with interfacing. I will not talk about how to sew with lining because you can easily find them on the Internet. One small tip for sewing clean lining to the main fabric: Cut the seam allowance of the lining 0.5 centimeter smaller than the main fabric pieces, so that when you sew them together, the main fabric will roll inside and the lining will not be shown.

The pattern is created in pdf format using A4 paper. I can also create the pattern in other paper sizes (A0 to A4, Letter, Tabloid), so please inform me if you need them.

Print the patterns on A4 paper at actual size/no scaling/100%. Not sure how to print and cut the patterns? Check the guide here.

Do you want to add side seam pockets to the pattern for additional convenience? Just go ahead because it is too easy, just follow the quick instruction here.

Again, happy sewing! I look forward to seeing your masterpiece!

XOXO

Tiên the Little Sewist

Cutting instruction:

After taping down all the pages following the instruction, the overall layout of the pattern pieces is much like this (the arrangement of pattern pieces will vary a bit with sizes because I want to utilize all space to result in least number of pages):

The cutting instruction is for the garment with facings. If you choose to sew it with bias binding, skip the front facing and back facing pieces. If you choose to sew with bodice lining, skip the facing pieces and cut a set of front and back pieces in lining fabric.

A. Front Skirt - 1pcs

B. Back Skirt - 2pcs

C. Front Bodice - 1pcs

D. Back Bodice - 2pcs

E. Front Facing – 1pcs + Fusible Interfacing – 1pcs

F. Back Facing – 2pcs + Fusible Interfacing – 2pcs

Download links for the dress:

Check for your size in the Size Chart before downloading. Not finding your size? Comment your height, bust – waist – hip measurements in the comment box below and I will send you the custom-made pattern for you as soon as I can!

Petite XS

Regular XS

Petite S

Regular S

Petite M

Regular M

Petite L

Regular L

Petite XL

Regular XL

Petite XXL

Regular XXL

Sunday, June 24, 2018

Crescent detail dress pattern

(Download links at the end of the post)

Loving to try a new thing for a boring day? I have an interesting pattern for you.

I love dart manipulation, because it gives me countless possibilities to make a garment to my taste. I have a habit of looking carefully at designer clothing to see how they manipulated the darts on the garments.

Dart manipulation is the most fundamental and versatile way to turn simple slopers into flattering fashion.  The most used techniques are dart manipulation via pivot points and slash and spread/close. If you look closely at the minimalist designs by famous fashion designers, you may find a lot of artistry ways to cut and sew a dress, and some of them are surprisingly simple and easy to follow along. You will see a sheath dress just a sheath dress at first glance, but a special piece at the second look. Just look at Milly, Michael Kors or Victoria Beckham’s sheath dress designs, you will find a lot to learn from her!

I will not talk much about these techniques here, because you can find lots of books and tutorials about them. Let’s turn to the pattern I am sharing today: the mini dress with crescent detail at the front.

image

I found this idea of dart manipulation in the Mix and Match pattern making on Sewist.com and it is so interesting that I try to mix this kind of bodice on a suitable bottom and make a dress with this. Because the crescent detail is a statement on its own, I choose a simple above the knee A line center-pleated skirt design. I was happy with the result: a mini dress with a fun twist!

Actually, this dress is pretty easy to sew. You just need to be extra careful when sewing the crescent dart. For those who are new to sewing, try pinning or basting the pieces first before you start the sewing machine.

You can see in the photo below the pattern pieces for the front of the dress – the two pieces should be aligned and sewn together precisely to make a perfect circle – which is vital to ensure the value of the dress. Do you think it is interesting enough to give it a try?

image

The pattern is created in pdf format using A4 paper. I can also create the pattern in other paper sizes (A0 to A4, Letter, Tabloid), so please inform me if you need them.

Not sure how to print and cut the patterns? Check the guide here.

Again, happy sewing! I look forward to seeing your masterpiece!

XOXO
Tiên the Little Sewist

Download links for the crescent dart detail dress:

Check for your size in the Size Chart before downloading. Not finding your size? Comment your height, bust – waist – hip measurements in the comment box below and I will send you the custom-made pattern for you!

  Petite XS  Regular XS
  Petite S  Regular S
  Petite M  Regular M
  Petite L  Regular L
  Petite XL  Regular XL
  Petite XXL  Regular XXL