Showing posts with label shift dress. Show all posts

Friday, August 16, 2019

Simple sewing pattern: Edith loose fitting midi dress

Well, I found out that the posts that have been viewed the most times on my blog are those sharing simple patterns. I guess many of my readers are newbies, or just too busy to have time to invest in a sophisticated projects. Even I sometimes feel too lazy to cut and sew too many details - so I often opt for simple pieces of garment, which do not take more than 2 hours to finish.

So today it is going to be a simple dress: a drop shoulder loose fitting midi dress, which is great for a lazy day. See how it looks in 3D simulation? Do you think it will be nice for a picnic in the park? Or even for a fall wedding (if made with luxurious fabric)?


Here is how it looks on the model (she is wearing size M):

I even made a simulation for orange color:

The pattern is made using layered PDF, please check for your size before printing so you won’t waste your paper. If you still do not know how to print a layered PDF, please check for the instruction here.
You can print this using your home printer and A4/Letter paper. I calculated the printing area so that you will be able to use either type of paper to print the pattern out perfectly. Always print the first page first and check with the test square if you are printing at the right scale before you print out the whole pattern.

Do you want to add side seam pockets to the pattern for additional convenience? Just go ahead because it is too easy, just follow the quick instruction here.

Cutting instruction:

After taping down all the pages following the instruction, the overall layout of the pattern pieces is like this:


The cutting instruction is for the garment with facings. If you choose to sew it with bias binding, skip the front facing and back facing pieces. If you choose to sew with bodice lining, skip the facing pieces and cut a set of front and back pieces in lining fabric.

A. Front - 1pcs
B. Back - 2pcs
C. Sleeve -  2pcs
D. Front Facing – 1pcs + Fusible Interfacing – 1pcs
E. Back Facing – 1pcs + Fusible Interfacing – 1pcs

This is the link to download this pattern: Edith loose fitting midi dress (size XXS - XXL)

Happy sewing!
Tien the Little Sewist

Monday, July 9, 2018

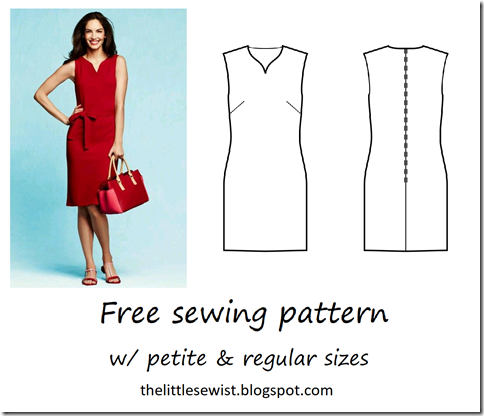
Easy shift dress pattern

(Scroll down to the end of the post for download links)

The pattern today is inspired by a dress I found on Pinterest. If I remember exactly, it is a piece by Talbots – and the reason I love it is because of the neckline, it is lovely and unusual, and still easy to sew. The neckline creates an accent to the classic shift dress and makes it more interesting. Also I love the removable sash belt which can be made with leftover fabric when you sew the dress. Just a few hours and you will have a nice day dress!

image

If you wonder how to make the sash belt: Cut a long strip of fabric, it must be long enough to cover your waist and make a nice bow. I recommend you cut the strip with the length about your waist measurement plus 70 centimeters/27.5 inches, the width of about 15 centimeters/6 inches. You can cut it either along the grainline, or on the bias (however you think would take up the least fabric). Fold and stitch it to make a tube. Turn the tube over and stitch the opening. Press it and you have a sash belt ready to go!

The pattern is created in pdf format using A4 paper. I can also create the pattern in other paper sizes (A0 to A4, Letter, Tabloid), so please inform me if you need them.

Print the patterns on A4 paper at actual size/no scaling/100%. Not sure how to print and cut the patterns? Check the guide here.

Do you want to add side seam pockets to the pattern for additional convenience? Just go ahead because it is too easy, just follow the quick instruction here.

Again, happy sewing! I look forward to seeing your masterpiece!

XOXO

Tiên the Little Sewist

Cutting instruction:

After taping down all the pages following the instruction, the overall layout of the pattern pieces is much like this (the arrangement of pattern pieces will vary a bit with sizes because I want to utilize all space to result in least pages):

image

The cutting instruction is for the dress with facings. If you choose to sew the dress with bias binding, skip the front facing and back facing pieces. If you choose to sew the dress with lining, skip the facing pieces and cut a set of front and back pieces in lining fabric.

A. Front - 1pcs
B. Back - 2pcs
C. Front Facing – 1pcs + Fusible Interfacing – 1pcs
D. Back Facing – 2pcs + Fusible Interfacing – 2pcs

Download links for the dress:

Check for your size in the Size Chart before downloading. Not finding your size? Comment your height, bust – waist – hip measurements in the comment box below and I will send you the custom-made pattern for you as soon as I can!

Sunday, June 17, 2018

Round neck 3/4 sleeve shift dress pattern


(Scroll down for download links if you do not want to read my rambling 😉)

I found out that the most popular patterns on my blog are the simplest one! It is easy to understand though, because most skilled hobby tailors are capable of drafting their own patterns, and only looking at a dress they can find the way to draft a similar one. The less experienced tailors (like me a few years ago) would prefer using ready-made patterns. First, because they are always ready to use and save a lot of time calculating. And second, they are better made than the ones I drafted myself, I just need a dress close to my size and do a bit of adjusting, and the patterns will fit me nicely. But ready-made patterns are not always available on the internet for free, and we are not always happy to pay for a pattern that we do not know if it fits or not. That is why I decide to write this blog to share the patterns, mostly simple ones, to you all!

The pattern I am sharing today is another simple shift dress that one of my favorite fashion icons – Queen Letizia of Spain – wore. It has a round neck, ¾ sleeves and an above the knee length finish. She chose the dress in beige eyelet and mix it with nude shoes and a clutch of the same color. Isn’t she beautiful? So simple and so elegant, do you think so?


This is an everyday dress which can be worn to almost everywhere. You can dress it up for a formal meeting (like Queen Letizia did) or dress it down for a picnic with a pair of flats and a wide brimmed hat. Most of all, it is easy to sew, and only requires you the basic sewing technique. To me, this darling is a fail-proof one :) The only thing you need to notice is choosing a good fabric, so it does not look like a dress that you wear to sleep :)

The pattern is created in pdf format using A4 paper. I can also create the pattern in other paper sizes (A0 to A4, Letter, Tabloid), so please inform me if you need them.

Not sure how to print and cut the patterns? Check the guide here.

Again, happy sewing! I hope to see your masterpiece!
XOXO
Tiên the Little Sewist

Download links for the basic dress block:

Check for your size in the Size Chart before downloading. 

Not finding your size? Comment your height, bust – waist – hip measurements in the comment box below and I will send you the custom-made pattern for you!


Instruction for cutting:

If you make this dress with lining:
A. Front - 1pcs shell fabric + 1pcs lining fabric
B. Back - 2pcs shell fabric + 2pcs lining fabric
E. Sleeve - 2pcs shell fabric

If you make this dress with interfacing:
A. Front - 1pcs
B. Back - 2pcs
C. Front Facing - 1pcs + Front Interfacing – 1pcs
D. Back Facing - 2pcs + Back Interfacing – 2pcs
E. Sleeve - 2pcs


Monday, March 26, 2018

3/4 sleeve scoop neck shift dress pattern


This is one of the easiest dresses to sew. You will just need a couple of hours (if you are a newbie) to finish this and have a totally new dress!


This dress features a scoop neckline to show off your sexy collarbone, and the shift dress form gives you plenty of room to breath and covers your big belly (if you have one). Choose a fun print, and you will have a nice outfit for a day out in the sun!

The pattern is created with below the knee length. If you prefer a longer or shorter dress, modify the pattern accordingly. 

The pattern is created in pdf format using A4 paper. The patterns use the sizes in the size chart here. If your size is different from the one shown in my blog, please comment your measurements below. I will make a pattern closest to your measurements. I can also create the pattern in other paper sizes (A0 to A4, Letter, Tabloid), so please inform me if you need them.

Not sure how to print and cut the patterns? Check the guide here.

Again, happy sewing! I hope to see your masterpiece!
XOXO
Tiên the Little Sewist


Instruction (for newbies – if you are not one, just scroll down to the download links).

Cutting:
A. Front - 1pcs
B. Back - 2pcs
C. Front Facing - 1pcs + Interfacing 1pcs
D. Back Facing - 2pcs + Interfacing 2pcs
E. Sleeve - 2pcs
Lay your fabric of choice flat on the table according to straight of grain as marked by the dashed arrow on the pattern pieces.
The front piece will be cut on fold, so you need to correspond the folded edge with the one marked with a fold mark on the pattern piece.
Cut the fabric according to the quantity required on each pattern block. For example, if the pattern shows Main, Interfacing – cut 1+1”, it means that you need to cut 1 piece as is and 1 mirrored piece from the main fabric as well as from interfacing.
Mark all notches from the pattern pieces to your fabric. When sewing the dress, you need to pay attention to notches to match them up.

Sewing:
1. Apply fusible to the interfacing.
2. Sew darts on Front pieces. Choose a stitch length of about 2 to 2.5 from the outer edge towards end of the dart so that the last stitch is very close to fabric. Stitch off the edge at the dart point, leave thread tails and tie a knot. Press towards top.
3. Sew darts on Back pieces the same way as the front darts and press towards center.
4. Serge center back edges separately. Insert invisible zipper or lapped zipper to your liking.
5. Sew shoulder seams. Serge and press towards back.
7. Sew shoulder seams of neckline facings. Press seam apart and serge. Serge outer edge of facings.
8. Pin facing onto Shell right sides together, adjusting neckline edges. Sew the neckline carefully. Clip into curves, turn the right side out and press. Slip stitch facing to seam allowance of shoulder seam on shell. Slipstitch facing to zipper tape.
9. Sew sleeves into armholes matching notches and gathering ease on cap. Serge and press towards sleeve.
10. Sew side and sleeve seams continuously. Serge and press towards back.
11. Serge lower edge of sleeves. Turn under, press and topstitch or slip stitch as desired.
12. Serge hem, turn under, press and topstitch or slip stitch as desired.

Download links for the scoop neck ¾ sleeve shift dress:

Check for your size in the Size Chart before downloading.


Wednesday, January 10, 2018

Sleeveless A-line mod dress pattern


OK, the first pattern that I love to share is the oh so very classic mod dress, which you can see in the photo. The A-line mod dress was worn by Jean Shrimpton in 1965, which caused a scandal at the Melbourne Cup.

The dress is simple - and it is easy to make, even for those who only know sewing for a short time. It is also easy to mix with other accessories - see how Jean Shrimpton put a jewel on her chest and made it look elegant and expensive?

You can see in the technical drawing, it is such an easy project to make! It took me like about an hour to make the dress! And you can make some alteration to the pattern. For example, you can ditch the facing and use contrast bias tape to finish the neckline and the armholes. Or just find a very special printed fabric to make the dress. Or hand embelishing the neckline just like the Miu Miu dress below. They will be no less luxe than the one sold at a thousand dollars!


The sewing patterns are created for size 10, 12 and 14 petite.

The pattern can be downloaded for free at the end of the post. You can just print it on A4 paper (at 100% or no scaling) then cut along the line and tape them together. The pattern has seam allowance added, so just put it on the fabrics, cut and sew!

If you need other sizes and heights, please leave a comment and I will alter the pattern accordingly. I can provide patterns not only for petites but also other sizes (including normal and tall).

Happy sewing!


For those who are not sure about the sizes, please refer to the size chart here: The Little Sewist Size Chart

Click on the link to download the pattern:


All the sewing patterns on this blog can be downloaded for free! Please share with others if you like. Thank you for your support!

Tien - the Petite Sewist