Showing posts with label casual dress. Show all posts

Saturday, July 6, 2019

A little twist to the drop waist dress

Hi friends,

I got a bit carried away and played around with the pattern for the drop waist dress that I shared a few days ago. I changed the neckline to V shape, and made a tiered flounce. It turned out quite nice and I was so happy with it. I even spent some time to turn it into a printable PDF pattern!

This is how it looks from front and back. It's simple and has a flirty feel because of the layered hem, and I believe if you make it in soft, flowy fabric, you will have a nice dress for a day out.


And this is a 360 degree view. I made this GIF image but the quality is quite low :(


Do you feel that this is nice? Tell me how you think of it!

I am sharing the pattern here just in case you need it. You can easily modify the pattern for the drop waist that has been shared previously to get this pattern.

Again, this pattern is made in layered PDF, check how to print out your size in this instruction and remember to check for your size before printing.

This is how it looks when I printed just size L and taped all pages together:


Happy sewing,
Tien the Little Sewist

Wednesday, July 3, 2019

Free PDF sewing pattern: Sleeveless drop waist dress

In this post I am sharing the pattern for the summery sleeveless drop waist dress that I have introduced in the previous post.


A week ago, I came across an article about creating and printing layered PDF files, and it comes to my mind that I can also create such files to make my patterns clearer and easier to use for my readers. And this is my first pattern created using layered PDF format.

Because I am using layered PDF format, I add a lot of details into the pattern, so if you open the file with all layers displayed, you will see very messy pages with a lot of lines and dots and colors. I bet you will be confused if you print all layers out. Don't worry, just follow the steps to print out a layered PDF, and you will thank technology for creating such wonderful and convenient file format.

There is also some small changes in the patterns. If you print out your size (for example, size M), you will see that there are both cutting lines and sewing lines. I have seen many newbies complaining that they do not know how to determine seam allowance in a pattern that only has cutting lines or sewing lines. In order to help, I am adding both sewing lines and cutting lines into the pattern, and if you print the pattern out, you will see them both. The inner lines are sewing lines, and the outer lines are cutting lines. If you want to sew exactly like how the pattern is created, just cut along the cutting lines. If you want to make some alterations to the pattern, use the sewing lines.

Normally, I create patterns for both regular and petite sizes, but this dress is quite simple and have no waistline defined, and you can wear it a bit long or short. So, there is only one pattern for the dress.

After printing and taping together all pages, you will get a pattern like this (I just print one size only):


OK, that's some improvements that I made to my patterns, and here is the link to download: the Sleeveless drop waist dress (size XXS - XXL).

Please check for your size in the size chart before printing. This pattern can be printed on both A4 and Letter sized paper.

Happy sewing!
Tien the Little Sewist

Monday, July 9, 2018

Easy shift dress pattern

(Scroll down to the end of the post for download links)

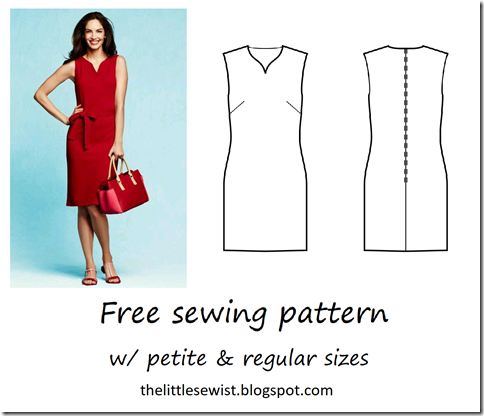
The pattern today is inspired by a dress I found on Pinterest. If I remember exactly, it is a piece by Talbots – and the reason I love it is because of the neckline, it is lovely and unusual, and still easy to sew. The neckline creates an accent to the classic shift dress and makes it more interesting. Also I love the removable sash belt which can be made with leftover fabric when you sew the dress. Just a few hours and you will have a nice day dress!

image

If you wonder how to make the sash belt: Cut a long strip of fabric, it must be long enough to cover your waist and make a nice bow. I recommend you cut the strip with the length about your waist measurement plus 70 centimeters/27.5 inches, the width of about 15 centimeters/6 inches. You can cut it either along the grainline, or on the bias (however you think would take up the least fabric). Fold and stitch it to make a tube. Turn the tube over and stitch the opening. Press it and you have a sash belt ready to go!

The pattern is created in pdf format using A4 paper. I can also create the pattern in other paper sizes (A0 to A4, Letter, Tabloid), so please inform me if you need them.

Print the patterns on A4 paper at actual size/no scaling/100%. Not sure how to print and cut the patterns? Check the guide here.

Do you want to add side seam pockets to the pattern for additional convenience? Just go ahead because it is too easy, just follow the quick instruction here.

Again, happy sewing! I look forward to seeing your masterpiece!

XOXO

Tiên the Little Sewist

Cutting instruction:

After taping down all the pages following the instruction, the overall layout of the pattern pieces is much like this (the arrangement of pattern pieces will vary a bit with sizes because I want to utilize all space to result in least pages):

image

The cutting instruction is for the dress with facings. If you choose to sew the dress with bias binding, skip the front facing and back facing pieces. If you choose to sew the dress with lining, skip the facing pieces and cut a set of front and back pieces in lining fabric.

A. Front - 1pcs
B. Back - 2pcs
C. Front Facing – 1pcs + Fusible Interfacing – 1pcs
D. Back Facing – 2pcs + Fusible Interfacing – 2pcs

Download links for the dress:

Check for your size in the Size Chart before downloading. Not finding your size? Comment your height, bust – waist – hip measurements in the comment box below and I will send you the custom-made pattern for you as soon as I can!

Friday, June 29, 2018

V neck tunic dress pattern

Hi all,

It’s been quite some time since I started this blog to share free sewing patterns, and I feel so happy to see more and more visitors from all over the world coming to my blog. I do not know if you find your favorite patterns here or not, but I hope at least you find some inspirations and ideas for your next projects. I also hope to interact with you if possible – so please contact me if you share the same interest with me.

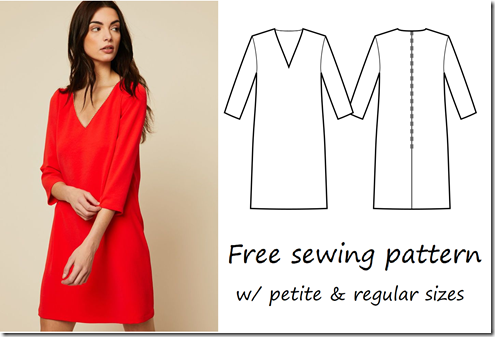
Today I am sharing yet another simple dress pattern – the V neck tunic dress. We all love comfortable clothing, don’t we? I am no exception, and that’s why I love sewing myself tunics. I have a mini collection of tunics in my wardrobe in all kind of colors and prints, and with only variations in neckline shapes and the length of sleeves – and I still love to have more! A few months ago, I already shared the pattern for the slit neck tunic dress (aka. the classic tunic dress pattern, you can find it here), and I am now sharing the newest tunic I just added to my collection.

1_108_260_277_230_258_246_472_473_315_317_351_353_356_359_360_357_358_352_269_286_288_technical_drawing

This tunic dress is super easy to sew – just like any other tunic which are made up of just a few pieces of fabric, but it has a deep V neckline to upgrade it to a sexy dress. Of course, if you choose a stretchy knit fabric, you need to pay extra attention not to make the neckline gaping. Fusible will be your best friend here.

I made this pattern with a zipper at the back of the dress, but if you are not into sewing zippers, just cut the back dress on fold and sew the two pieces together. The zipper should be saved for more sophisticated dresses. And if you want your dress to look more like the expensive hi-end fashion ones, add an invisible zipper. You can even add an exposed metal zipper for statement.

The pattern is created in pdf format using A4 paper. I can also create the pattern in other paper sizes (A0 to A4, Letter, Tabloid), so please inform me if you need them.

Not sure how to print and cut the patterns? Check the guide here.

Again, happy sewing! I look forward to seeing your masterpiece!

XOXO

Tiên the Little Sewist

The dress is made up of just a few simple pieces:

A. Front - 1pcs
B. Back – 2pcs (if you insert zipper)/ 1pcs (if you cut the back piece on fold)
C. Sleeve - 2pcs
D. Front Facing - 1pcs
E. Back Facing - 2pcs

Download links for the V neck tunic dress:

Check for your size in the Size Chart before downloading. Not finding your size? Comment your height, bust – waist – hip measurements in the comment box below and I will send you the custom-made pattern for you!

Petite XS

Regular XS

Petite S

Regular S

Petite M

Regular M

Petite L

Regular L

Petite XL

Regular XL

Petite XXL

Regular XXL

Sunday, June 24, 2018

Crescent detail dress pattern

(Download links at the end of the post)

Loving to try a new thing for a boring day? I have an interesting pattern for you.

I love dart manipulation, because it gives me countless possibilities to make a garment to my taste. I have a habit of looking carefully at designer clothing to see how they manipulated the darts on the garments.

Dart manipulation is the most fundamental and versatile way to turn simple slopers into flattering fashion.  The most used techniques are dart manipulation via pivot points and slash and spread/close. If you look closely at the minimalist designs by famous fashion designers, you may find a lot of artistry ways to cut and sew a dress, and some of them are surprisingly simple and easy to follow along. You will see a sheath dress just a sheath dress at first glance, but a special piece at the second look. Just look at Milly, Michael Kors or Victoria Beckham’s sheath dress designs, you will find a lot to learn from her!

I will not talk much about these techniques here, because you can find lots of books and tutorials about them. Let’s turn to the pattern I am sharing today: the mini dress with crescent detail at the front.

image

I found this idea of dart manipulation in the Mix and Match pattern making on Sewist.com and it is so interesting that I try to mix this kind of bodice on a suitable bottom and make a dress with this. Because the crescent detail is a statement on its own, I choose a simple above the knee A line center-pleated skirt design. I was happy with the result: a mini dress with a fun twist!

Actually, this dress is pretty easy to sew. You just need to be extra careful when sewing the crescent dart. For those who are new to sewing, try pinning or basting the pieces first before you start the sewing machine.

You can see in the photo below the pattern pieces for the front of the dress – the two pieces should be aligned and sewn together precisely to make a perfect circle – which is vital to ensure the value of the dress. Do you think it is interesting enough to give it a try?

image

The pattern is created in pdf format using A4 paper. I can also create the pattern in other paper sizes (A0 to A4, Letter, Tabloid), so please inform me if you need them.

Not sure how to print and cut the patterns? Check the guide here.

Again, happy sewing! I look forward to seeing your masterpiece!

XOXO
Tiên the Little Sewist

Download links for the crescent dart detail dress:

Check for your size in the Size Chart before downloading. Not finding your size? Comment your height, bust – waist – hip measurements in the comment box below and I will send you the custom-made pattern for you!

  Petite XS  Regular XS
  Petite S  Regular S
  Petite M  Regular M
  Petite L  Regular L
  Petite XL  Regular XL
  Petite XXL  Regular XXL

Wednesday, June 20, 2018

V neck half sleeve full circle dress pattern


(Scroll down for download links)

Playing the song “Red” by MAGIC! (I love this song!)

I said hey you with the red dress on
I gotta find a way to take it off
I got a lot of love and it's growing strong
When I see you with your red dress on

Red dress! I love red dresses! And I totally agree with the saying: “When in doubt, wear red” by Bill Blass. I am so in love with the bright and sexy color which makes all kind of styles so stylish. According to what I read about color theory, red color means energy, passion, love and power – an emotionally intense color. Red attire has distinct effect on both the wearers and people who see them. Red color makes the wearer more confident and happy, so choose a red piece when you feel down, and you will see your mood improved!


The pattern I am sharing today is inspired by a red dress I accidentally came upon when surfing Pinterest. The plus size model in this red midi dress looks totally stunning! A deep V neckline and a flirty full circle skirt make the dress a totally head-turner, even with the simplest or no acessories. And even better, this dress can magically flatter most types of body shape and turn them into almost hourglass shape!

I immediately decided to make myself a similar dress like this one! But I am not so confident to choose the bright red color, so I chose a darker shade – burgundy.

Of course, if red color is not your taste, you can choose a different color, like dark red, deep blue or dark green, etc. Just the shape of the dress is enough to make you stand out in the party.

The pattern is created in pdf format using A4 paper. I can also create the pattern in other paper sizes (A0 to A4, Letter, Tabloid), so please inform me if you need them.

Not sure how to print and cut the patterns? Check the guide here.

Again, happy sewing! I look forward to seeing your masterpiece!
XOXO
Tiên the Little Sewist

Download links for the V neck half sleeve full circle dress:

Check for your size in the Size Chart before downloading. Not finding your size? Comment your height, bust – waist – hip measurements in the comment box below and I will send you the custom-made pattern for you!


Instruction for cutting:

If you make this dress with lined bodice:
A. Front Bodice - 1pcs shell fabric + 1pcs lining fabric
B. Back Bodice - 2pcs shell fabric + 2pcs lining fabric
C. Front Skirt - 1pcs
D. Back Skirt - 2pcs
E. Sleeve - 2pcs

If you make this dress with interfacing:
A. Front Skirt - 1pcs
B. Back Skirt - 2pcs
C. Front Bodice - 1pcs
D. Back Bodice - 2pcs
E. Front Facing - 1pcs + Front Interfacing – 1pcs
F. Back Facing - 2pcs + Back Interfacing – 2pcs
G. Sleeve - 2pcs


Sunday, June 17, 2018

Round neck 3/4 sleeve shift dress pattern


(Scroll down for download links if you do not want to read my rambling 😉)

I found out that the most popular patterns on my blog are the simplest one! It is easy to understand though, because most skilled hobby tailors are capable of drafting their own patterns, and only looking at a dress they can find the way to draft a similar one. The less experienced tailors (like me a few years ago) would prefer using ready-made patterns. First, because they are always ready to use and save a lot of time calculating. And second, they are better made than the ones I drafted myself, I just need a dress close to my size and do a bit of adjusting, and the patterns will fit me nicely. But ready-made patterns are not always available on the internet for free, and we are not always happy to pay for a pattern that we do not know if it fits or not. That is why I decide to write this blog to share the patterns, mostly simple ones, to you all!

The pattern I am sharing today is another simple shift dress that one of my favorite fashion icons – Queen Letizia of Spain – wore. It has a round neck, ¾ sleeves and an above the knee length finish. She chose the dress in beige eyelet and mix it with nude shoes and a clutch of the same color. Isn’t she beautiful? So simple and so elegant, do you think so?


This is an everyday dress which can be worn to almost everywhere. You can dress it up for a formal meeting (like Queen Letizia did) or dress it down for a picnic with a pair of flats and a wide brimmed hat. Most of all, it is easy to sew, and only requires you the basic sewing technique. To me, this darling is a fail-proof one :) The only thing you need to notice is choosing a good fabric, so it does not look like a dress that you wear to sleep :)

The pattern is created in pdf format using A4 paper. I can also create the pattern in other paper sizes (A0 to A4, Letter, Tabloid), so please inform me if you need them.

Not sure how to print and cut the patterns? Check the guide here.

Again, happy sewing! I hope to see your masterpiece!
XOXO
Tiên the Little Sewist

Download links for the basic dress block:

Check for your size in the Size Chart before downloading. 

Not finding your size? Comment your height, bust – waist – hip measurements in the comment box below and I will send you the custom-made pattern for you!


Instruction for cutting:

If you make this dress with lining:
A. Front - 1pcs shell fabric + 1pcs lining fabric
B. Back - 2pcs shell fabric + 2pcs lining fabric
E. Sleeve - 2pcs shell fabric

If you make this dress with interfacing:
A. Front - 1pcs
B. Back - 2pcs
C. Front Facing - 1pcs + Front Interfacing – 1pcs
D. Back Facing - 2pcs + Back Interfacing – 2pcs
E. Sleeve - 2pcs


Sunday, June 10, 2018

Asymmetrical gathered front dress pattern

Do you feel that basic dress patterns are just not challenging at all? Do you want to try a new style for your dress?

I always think that classic patterns are interesting, not just because I have countless choices of fabrics to make them, but also because the simpler the pattern, the more careful I need to make it look high-class. That is why you are going to see a lot of classic sewing patterns on my blog, and along with them are examples of luxury brands’ pieces to show you how simple patterns are turned into thousand-dollar babies.

Of course, as I am really into pattern making, I do not feel happy with just simple patterns. I think it is interesting to modify the pattern into various styles. One of the most popular ways to modify sewing patterns is dart modification. With just some slashes and shifts, you will have a totally new and innovative dress! Many times have I failed, because I tried something too unusual, and the results were more suitable to runways, not real life (at least for me, because I am not very adventurous with my outfits – I prefer safer choices). I finally realized that if you want your dress to be special, just use one or two details, don’t overdo it. For example, just change the upper part of the dress, do not touch the lower part, or just change the lower part and leave the upper part alone. Just one detail will be enough to make the dress unique and still suitable for us commoners. If you are not one, just try anything you can think of, the worst thing would be is you ruining some yards of your fabric (and papers). But every fail has its benefit, you will grow more experienced each time and won’t make the same mistakes again.


Today I am sharing with you the pattern for the asymmetrical gathered front dress. It features an asymmetrical gathered front bodice and a pleated (or gathered) below the knee skirt. I think it still looks classic with the length, but have a modern breath with the gathers. Also you can choose between a pleated skirt and a gathered skirt. A gathered one is suitable with thin and soft fabrics, while a pleated one is more suitable for thicker and stiffer fabrics.

The pattern is created in pdf format. You download the pattern of your size (check in the Size Chart) and print it on A4 paper at actual size/no scaling/100%. There is a test square where you can check if the pattern is printed true to size. If your size is different from the one shown in my blog, please comment your measurements below, and I will make a pattern closest to your measurements. I can create the pattern in other paper sizes (A0 to A4, Letter, Tabloid), so please inform me if you need them.

Again, happy sewing! I hope to see your masterpiece!
XOXO
Tiên the Little Sewist

Download links:


Instruction for cutting:

A. Front Skirt - 1pcs
B. Back Skirt - 2pcs
C. Front - 1pcs
D. Back - 2pcs
E. Front Facing - 1pcs + 1pcs of interfacing
F. Back Facing - 2pcs + 2pcs of interfacing
G. Sleeve - 2pcs


Thursday, June 7, 2018

Jersey knit maxi dress pattern


What do you think of when you hear the word “summer”?

You may think of summer holidays, the beaches, the countryside, the pools, or having fun in the sea, right?

To me, what I think of the most is the heat – and how to go out in the sun not being burnt, and still look stylish! Don’t tell me I am too obsessed with the sunlight. If you live near equator, you will understand the feeling of baring your skin under the scorching sunlight – it is not easy at all. Most of the time I go out during daytime, I put on hat, sunglasses and sunscreen. But how about the clothing? I don’t like wearing pants and jeans at all, they are not very comfortable in the hot and humid weather. I prefer a full length maxi dress to finish covering myself from head to toe :)


I love to wear maxi dresses, especially jersey knit maxi dresses. They are soft, breathable and great at absorbing sweat. And they do say ‘summer!’ Who would not love going out in a comfortable dress and still looking good? Put on a straw hat and a pair of nice flats, and you are ready for anywhere! From the beach to the countryside to the shopping mall, under the bright sun or in the shades of coconut trees.

I am sharing with you here the pattern for the full-length jersey knit dress. I still put the neckline interfacing here, but you can skip it to use a bias binding for the neckline. For the side seams, you can sew them straight to the end of the seams, or just sew them half the way down to have one or two side slits. The slit help you show of some leg and make the dress less boring.


The jersey maxi dress is actually very easy to cut but is a bit tricky to sew. Jersey knit may be a headache for beginners because of its stretchy nature. I used to avoid sewing patterns with jersey knits when I start sewing but it changed after a lot of trials and errors. At first, I thought I could never sew a nice garment with knits using my domestic sewing machine. But then I found some tips for sewing with jersey knit here. Now I can sew jersey knits with just my domestic sewing machine without any problem! Don’t be afraid of knit fabrics – they are not scary at all!

The pattern is created in pdf format. You download the pattern of your size (check in the Size Chart) and print it on A4 paper at actual size/no scaling/100%. There is a test square where you can check if the pattern is printed true to size. If your size is different from the one shown in my blog, please comment your measurements below, and I will make a pattern closest to your measurements. I can create the pattern in other paper sizes (A0 to A4, Letter, Tabloid), so please inform me if you need them.

Again, happy sewing! I hope to see your masterpiece!
XOXO
Tiên the Little Sewist

Download links for the jersey knit maxi dress:


Monday, May 7, 2018

Carolina Herrera inspired V neck button down dress


The pattern I am sharing with you today is a dress inspired by a beautiful piece in the Carolina Herrera Spring 2018 collection. Yes, you are going to see a lot of Carolina Herrera inspired dresses in my blog, because I am a huge fan of her designs! Who would not love the elegant designs that do not show too much skin but still make the wearer so charming and feminine? Not only her designs, I also love Carolina herself – she has been a fashion icon ever since she was young until now.


I love this deep V neck button down dress. It has a fun print (of course we cannot find THAT print anywhere in the fabric stores, but we can look for something similar, or choose any print we want, because we are making it ourselves!) a midi length and a lovely low V neck for those who dare to show off some skin. The dress calls for summer – bright fun prints and sleeveless design can keep you cool in the heat. Just put on the dress, a straw hat, slip-ons or wedges, and you are ready for the beach or the park! It is also suitable for garden parties where you can have a lot of fun with your friends and family.

In this pattern I already modified a bit of the neckline – after all, we are not all so confident to bare our chest in front of many eyes. I am quite an old-fashioned woman, so don’t mind me. You can cut the neckline deeper if you like.

The pattern was generated using a free online tool named Sewist CAD (you will find details here: http://www.sewist.com/) so it is not totally up to my intention. The kick pleat is not needed but is still shown. You should remove the kick pleat by drawing a straight line from the hip down to the hemline.

This dress can be made with various kinds of fabric. You can choose a 100% cotton fabric to cool you down in the summer heat; or use brocade for an evening date or a wedding. The options are endless, and you are always free to try (and do not fear to fail).

It is sometimes tricky to sew the V neckline – it is cut on a bias, so it may stretch and causing the neckline to gap. You should apply fusible interfacing before sewing to ensure it stays flat. Be extra careful when you sew the neckline – the quality of the dress depends much on it.

Again, the pattern is created in pdf format. You download the pattern of your size (check in the Size Chart) and print it on A4 paper at actual size/no scaling/100%. There is a test square where you can check if the pattern is printed true to size. If your size is different from the one shown in my blog, please comment your measurements below, and I will make a pattern most close to your measurements.

Again, happy sewing! I hope to see your masterpiece!

XOXO
Tiên the Little Sewist

Download links for the Carolina Herrera inspired V neck button down dress:


Monday, March 26, 2018

3/4 sleeve scoop neck shift dress pattern


This is one of the easiest dresses to sew. You will just need a couple of hours (if you are a newbie) to finish this and have a totally new dress!


This dress features a scoop neckline to show off your sexy collarbone, and the shift dress form gives you plenty of room to breath and covers your big belly (if you have one). Choose a fun print, and you will have a nice outfit for a day out in the sun!

The pattern is created with below the knee length. If you prefer a longer or shorter dress, modify the pattern accordingly. 

The pattern is created in pdf format using A4 paper. The patterns use the sizes in the size chart here. If your size is different from the one shown in my blog, please comment your measurements below. I will make a pattern closest to your measurements. I can also create the pattern in other paper sizes (A0 to A4, Letter, Tabloid), so please inform me if you need them.

Not sure how to print and cut the patterns? Check the guide here.

Again, happy sewing! I hope to see your masterpiece!
XOXO
Tiên the Little Sewist


Instruction (for newbies – if you are not one, just scroll down to the download links).

Cutting:
A. Front - 1pcs
B. Back - 2pcs
C. Front Facing - 1pcs + Interfacing 1pcs
D. Back Facing - 2pcs + Interfacing 2pcs
E. Sleeve - 2pcs
Lay your fabric of choice flat on the table according to straight of grain as marked by the dashed arrow on the pattern pieces.
The front piece will be cut on fold, so you need to correspond the folded edge with the one marked with a fold mark on the pattern piece.
Cut the fabric according to the quantity required on each pattern block. For example, if the pattern shows Main, Interfacing – cut 1+1”, it means that you need to cut 1 piece as is and 1 mirrored piece from the main fabric as well as from interfacing.
Mark all notches from the pattern pieces to your fabric. When sewing the dress, you need to pay attention to notches to match them up.

Sewing:
1. Apply fusible to the interfacing.
2. Sew darts on Front pieces. Choose a stitch length of about 2 to 2.5 from the outer edge towards end of the dart so that the last stitch is very close to fabric. Stitch off the edge at the dart point, leave thread tails and tie a knot. Press towards top.
3. Sew darts on Back pieces the same way as the front darts and press towards center.
4. Serge center back edges separately. Insert invisible zipper or lapped zipper to your liking.
5. Sew shoulder seams. Serge and press towards back.
7. Sew shoulder seams of neckline facings. Press seam apart and serge. Serge outer edge of facings.
8. Pin facing onto Shell right sides together, adjusting neckline edges. Sew the neckline carefully. Clip into curves, turn the right side out and press. Slip stitch facing to seam allowance of shoulder seam on shell. Slipstitch facing to zipper tape.
9. Sew sleeves into armholes matching notches and gathering ease on cap. Serge and press towards sleeve.
10. Sew side and sleeve seams continuously. Serge and press towards back.
11. Serge lower edge of sleeves. Turn under, press and topstitch or slip stitch as desired.
12. Serge hem, turn under, press and topstitch or slip stitch as desired.

Download links for the scoop neck ¾ sleeve shift dress:

Check for your size in the Size Chart before downloading.