Showing posts with label long sleeve. Show all posts

Sunday, August 4, 2019

Free PDF sewing pattern: Camilla puffed sleeve pattern

This top pattern I am sharing today is a simple puffed sleeve top. It is easy and can be made with almost any kind of fabric, from jersey to light weight chiffon. The puffed sleeve is super feminine, and most of all, it's one of the biggest trend for fall-winter 2019. You can see this kind of sleeve on almost any high street fashion collection! Make yourself a piece with puffed sleeve to keep up with the trend :)

This is the top pattern simulated in polka dot print. Nice, huh?


The pattern is made using layered PDF, please check for your size before printing so you won’t waste your paper. If you still do not know how to print a layered PDF, please check for the instruction here.
You can print this using your home printer and A4/Letter paper. I calculated the printing area so that you will be able to use either type of paper to print the pattern out perfectly. Always print the first page first and check with the test square if you are printing at the right scale before you print out the whole pattern.

Do you want to add side seam pockets to the pattern for additional convenience? Just go ahead because it is too easy, just follow the quick instruction here.

Cutting instruction:
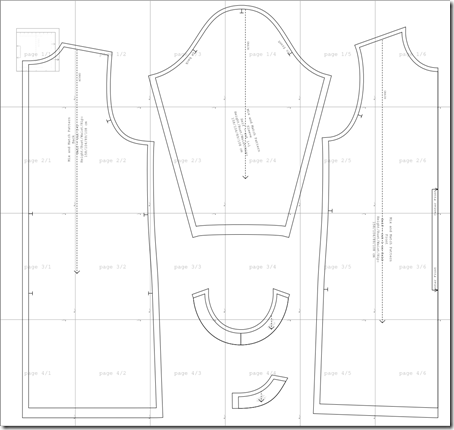
After taping down all the pages following the instruction, the overall layout of the pattern pieces is like this:


The cutting instruction is for the garment with facings. If you choose to sew it with bias binding, skip the front facing and back facing pieces. If you choose to sew with bodice lining, skip the facing pieces and cut a set of front and back pieces in lining fabric.

A. Front - 1pcs
B. Back - 1pcs
C. Sleeve - 2pcs
D. Cuff - 2pcs
E. Front Facing – 1pcs + Fusible Interfacing – 1pcs
F. Back Facing – 2pcs + Fusible Interfacing – 2pcs

This is the link to download this pattern: Camilla puffed sleeve top (size XXS - XXL)

Happy sewing!
Tien the Little Sewist

Saturday, July 21, 2018

Round neck long sleeve pleated dress

(Scroll down to the end of the post for download links)

This pattern is inspired by a dress by Carolina Herrera ( you know, I am obsessed with the design by Carolina Herrera!). It features a 5/8 length sleeve, round neck and knee long box pleated skirt. Although I am not very much into the striped design (because I am short and curvy, horizontal stripes make me shorter and fatter), I think this dress would be nice in almost any color and print. This design is also very versatile. You can either make it with soft and flowy fabric or with stiff and heavy fabric – it will create different feelings to the wearer and the watchers! Just try on and you will love it just like I do!

image

If you want to make the dress with striped fabric, remember to align the stripes at the seams. You don’t want to ruin the dress by not be careful enough to match the stripe together – it will make the dress look cheap. It is also one of the reasons I do not buy ready made clothes at the stores, the stripes are almost always skewed.

The pattern is created in pdf format using A4 paper. I can also create the pattern in other paper sizes (A0 to A4, Letter, Tabloid), so please inform me if you need them.

Print the patterns on A4 paper at actual size/no scaling/100%. Not sure how to print and cut the patterns? Check the guide here.

Do you want to add side seam pockets to the pattern for additional convenience? Just go ahead because it is too easy, just follow the quick instruction here.

Again, happy sewing! I look forward to seeing your masterpiece!

XOXO

Tiên the Little Sewist

Cutting instruction:

The cutting instruction is for the garment with facings. If you choose to sew it with bias binding, skip the front facing and back facing pieces. If you choose to sew with bodice lining, skip the facing pieces and cut a set of front and back pieces in lining fabric.

A. Front Skirt - 1pcs

B. Back Skirt - 2pcs

C. Sleeve - 2pcs

D. Front - 1pcs

E. Back - 2pcs

F. Front Facing - 1pcs

G. Back Facing - 2pcs

Download links for the dress:

Check for your size in the Size Chart before downloading. Not finding your size? Comment your height, bust – waist – hip measurements in the comment box below and I will send you the custom-made pattern for you as soon as I can!

Sunday, July 15, 2018

Side slit long tunic top pattern

(Scroll down to the end of the post for download links)
I am sharing this pattern because I was so in love with the jersey tunic in this photo! It is a knee long tunic with side slits. And it was mixed so well with skinny jeans! I also love the color combination of white jersey top and blue jeans. Just put on a pair of shades, flat sandals, and you are ready for a summer music festival!
image
What’s more, if you are not into jersey because you are worry about sewing with stretchy fabric, choose any kind of fabric to make this baby. It will look great if made with jersey (and very comfortable too), but will also be wonderful if made with chiffon or taffeta. Made with flowy fabric, it is soft and feminine. Made with stiff fabrics, it will become a statement! Maybe you are not familiar with Vietnamese Ao Dai, but try it on, you will have a pleasant surprise!
image
The pattern is created in pdf format using A4 paper. I can also create the pattern in other paper sizes (A0 to A4, Letter, Tabloid), so please inform me if you need them.
Print the patterns on A4 paper at actual size/no scaling/100%. Not sure how to print and cut the patterns? Check the guide here.
Do you want to add side seam pockets to the pattern for additional convenience? Just go ahead because it is too easy, just follow the quick instruction here.
Again, happy sewing! I look forward to seeing your masterpiece!
XOXO
Tiên the Little Sewist
Cutting instruction:
After taping down all the pages following the instruction, the overall layout of the pattern pieces is much like this (the arrangement of pattern pieces will vary a bit with sizes because I want to utilize all space to result in least pages):
image
The cutting instruction is for the garment with facings. If you choose to sew it with bias binding, skip the front facing and back facing pieces. If you choose to sew it with bodice lining, skip the facing pieces and cut a set of front and back pieces in lining fabric.
A. Front  - 1pcs
B. Back – 2pcs (if you don’t want to sew the zipper, cut 1pcs on fold, remember to remove the seam allowance at the center back)
C. Sleeve - 2pcs
D. Front Facing – 1pcs + Fusible Interfacing – 1pcs
E. Back Facing – 2pcs + Fusible Interfacing – 2pcs (if you don’t want to sew the zipper, cut 1pcs on fold, remember to remove the seam allowance at the center back)
Download links for the dress:
Although this long tunic top is sewn with stretch jersey fabric, it is not very strict with sizes. However, just to make sure you get the best fit, check for your size in the Size Chart before downloading. Not finding your size? Comment your height, bust – waist – hip measurements in the comment box below and I will send you the custom-made pattern for you as soon as I can!

Friday, July 6, 2018

Sheath dress with waist inset

(Scroll down to the end of the post for download links)

I am not going to talk much about this dress. I found the picture on the Internet and thought that it is really cool – with the bold contrast waistband inset. A great combination of black and red, and the result? A powerful woman who controls everything in her hands!

image

Of course many of us will not be brave enough to put on such bright red colors, so we can go with other options: Do you think of black and white prints and black waist inset? Or one brighter and one darker shade of a color (for example: green and dark green). There are countless options which depends on your creativity, so just try and be surprised with your own imagination.

The pattern is created in pdf format using A4 paper. I can also create the pattern in other paper sizes (A0 to A4, Letter, Tabloid), so please inform me if you need them.

Not sure how to print and cut the patterns? Check the guide here.

Do you want to add side seam pockets to the pattern for additional convenience? Just go ahead because it is too easy, just follow the quick instruction here.

Again, happy sewing! I look forward to seeing your masterpiece!

XOXO

Tiên the Little Sewist

Cutting instruction:

After taping down all the pages following the instruction, the overall layout of the pattern pieces is much like this (the arrangement of pattern pieces will vary a bit with sizes because I want to utilize all space to result in least pages):

image

The cutting instruction is for the dress with facings. If you choose to sew the dress with bodice lining, skip the facing pieces and cut a set of front and back pieces in lining fabric.

A. Sleeve - 2pcs
B. Front Skirt - 1pcs
C. Back Skirt - 2pcs
D. Front - 1pcs
E. Back - 2pcs
F. Front Facing - 1pcs
G. Side Front Waist Inset - 2pcs
H. Side Back Waist Inset - 2pcs
I. Center Front Waist Inset - 1pcs
J. Center Back Waist Inset - 2pcs
K. Back Facing - 2pcs

Download links for the dress:

Check for your size in the Size Chart before downloading. Not finding your size? Comment your height, bust – waist – hip measurements in the comment box below and I will send you the custom-made pattern for you!

Petite XS

Regular XS

Petite S

Regular S

Petite M

Regular M

Petite L

Regular L

Petite XL

Regular XL

Petite XXL

Regular XXL

Monday, April 30, 2018

Notched Peter Pan collar long sleeve shift dress pattern

Let's talk about being an alien in the clothing stores. I know this is the common feeling of those who have the non-standard figures like me.

I am short, have big breasts and small hip, but I am not the typical apple body shape. I have narrow shoulders and really small hip. And with many ready made clothes, I find it quite a nightmare to get a piece suitable for me. If it fits my heavy top, the bottom will be too loose. If it fits the bottom, I can't get the zipper up to my breast. Even worse, the clothes are often made for taller people, and petite clothing line seems to be rare and the designs are not very attractive. Everytime I went to the stores, I felt myself less confident. Sometimes I thought I was so ugly, so different, I could never be beautiful and glow like the models on the internet.

The problem got worse after I gave birth to my dear son, who is 8 months old now. My breast jumped from C cup to F cup, and it was even harder to find an item that would not make me a 3-headed monster. For the first months, I buried myself in slouchy T-shirts and pajama pants, and was not very concerned about my looks as I thought I did not need to be so collected when I stayed at home to look after my baby. But when my baby was 2 months old, my best friend invited me to her wedding - and I found myself having nothing to wear to such an event!

I searched all the clothing stores in my town to find me a suitable piece - but, again, the problem remained: the dresses were either too long or too tight or too loose. You can understand my feeling back then - so disappointed looking at the mirrors and find yourself just not belong there - in the store.

I decided that rather than wasting my time at the stores with almost no hope, I should make myself a dress. And I chose the notched Peter Pan collar shift dress, and uncovered the sewing machine. And voilà, after just a few hours (interrupted a few times for breastfeeding my baby), I got the dress I want.


The dress was pretty much the same as the picture (sorry I can't post the picture of myself here - I am not confident enough to show off my face online). Because I had not got back my shape after giving birth, I chose a dark color fabric and added a white collar to brighten up the dress a bit.

I know a lot of women have the same problem with me. And some are content with the store bought clothing even if they do not fit them very well. They spend a lot of time in the stores looking for their acceptable pieces, and of course they will find the things they want after a long time of searching. But for those who are capable of sewing, just invest a little of your time to sewing your own dresses, you will find yourself more and more attracted to the self-made items. Not only do you have a custom made item, but also you can find a feeling of accomplishment after making such piece.

I'm sharing in this post the pattern for the notched Peter Pan collar shift dress to you here. Hope you will enjoy making the dress and feel more confident about your beauty!

The pattern is made in pdf format. Download the pattern of your size (check the Size Chart before downloading), print it on A4 paper at no scaling/actual size/100% setting, cut and tape and start sewing!

Hope you will enjoy this and please share with me your masterpieces!

XOXO 
Tiên the Little Sewist

Download links:


Friday, April 13, 2018

Esme Vie inspired coat pattern


(Download links at the end of the post)


I must admit that I often take inspiration form high-end fashion. Many of my dresses are made after I look at the newest fashion collection. Although my amateur skills are far from those artists who made them, but I still wish that one day I can make such beautiful pieces (don’t laugh at me, I know I can never have my hands on those expensive fabrics!)

The pattern I share today is inspired by the Esme Vie coat, which is sold at $3,000 on Moda Operandi. For those who haven’t heard of this Italian brand, just Google the name and you will see a lot of beautiful designs. The dress features an elegant midi length, button down placket, long sleeves and flower pearl buttons, which is so suitable for a late fall or winter wedding. In fact, I have seen pictures of this dress worn by a bride. She looked totally gorgeous! Don’t you think that this dress is pretty princess-like? I remember Kate Middleton wearing many similar designs in royal events.


When you sew this dress, fully line it to create the feeling of a thousand-dollar baby. Also choose the right buttons so you do not undermine the dress. You may not have the flower pearl buttons exactly the same as the Esme Vie dress, but you can choose from a wide range of handmade vintage buttons at the craft stores or online.

So if you are a bride-to-be who loves to DIY your own wedding dress, this Esme Vie dress is one worth considering not only because of its elegant design, but also because it is pretty easy to sew. Choose heavy bodied fabrics like sateen, dupioni or brocade to ensure the volume of the dress.

The pattern is created in pdf format using A4 paper. The patterns use the sizes in the size chart here. If your size is different from the one shown in my blog, please comment your measurements below. I will make a pattern closest to your measurements. I can also create the pattern in other paper sizes (A0 to A4, Letter, Tabloid), so please inform me if you need them.

Not sure how to print and cut the patterns? Check the guide here.

Again, happy sewing! I hope to see your masterpiece!

XOXO
Tiên the Little Sewist

Download links for the Esme Vie inspired coat:

Check for your size in the Size Chart before downloading.


Instruction for cutting:

This dress is fully lined, so you should prepare one part of self-fabric and one part of lining fabric.

Self
A. Center Front Placket - 2pcs
B. Front Skirt - 2pcs
C. Back Skirt - 2pcs
D. Front - 2pcs
E. Back - 2pcs
F. Back Facing - 2pcs
G. Sleeve - 2pcs
Lining
A. Front Skirt - 2pcs
C. Back Skirt - 2pcs
D. Front - 2pcs
E. Back - 2pcs
F. Sleeve - 2pcs

Monday, January 15, 2018

The basic dress block #1


(Download links at the end of the post)

I would love to post here the basic dress block, which is the start of all kinds of dresses. If you are a just a bit familiar with sewing, you may have heard of this already.


When I first started sewing about thirteen years ago, I struggled with drafting a correct basic dress block for my figure because I was just a self-taught designer. I read a lot of designing books, and it finally became easier for me to draft the block for myself (at first, I was only thinking of sewing my own dresses). Gradually, I got more ‘customers’ who were my mother, my sisters, friends and their mothers. They all loved to have the custom-made dresses that I sew for them. Choosing between a dress made exactly for your figure and a store bought one, you know the result!

The hobby then became a small business. At peak time, I had customers waiting for 1 month to get their desired dress. I always draft a personal basic dress block for each of my customers and save it for the next time they come to me. As I had more customers, it took me more and more time to start from scratch, and I understand the feeling of those who must spend a lot of time beginning. That is why I turned to digital designing. And now I just need to input the measurements and print out the blocks. Next, I just need to modify it to make the styles to customer’s ideas.

A basic dress block is surely a great time-saver. From this you can easily modify and create all kind of styles and designs. If you are a newbie, just this block can turn into a great sheath dress! If you are already familiar with designing using blocks, you will find it enjoyable just copying it to drafting paper, then draw and cut them to your ideas. There are a lot of books about pattern drafting, and all of them start with a basic block. You can also find on the Internet a lot of blogs talking about pattern modification – I sometimes take ideas from them. Pinterest is also a good source for ideas – I have a board named Sewing where I put a lot of pictures related to sewing and pattern drafting. Surfing Pinterest has also become one of my favorite leisure time activity!

That’s enough with the blabbing! Now turn to the pattern pieces that I am sharing today!

The basic dress block is, um, up to its name, basic! And it is important – I must say it is the foundation of fashion designing. You cannot have a good dress if you do not have a good basic block – of course there are some dresses that do not require patterns, I will write about them some day.

As I am short and curvy, I love to make petite patterns to share with those who has the same problem with me. That is why this basic dress block is created for both petite size and normal size. It is also created without any seam allowance. When you finish modifying the block, add seam allowance as you love to.

The pattern is created in pdf format using A4 paper. The patterns use the sizes in the size chart here. If your size is different from the one shown in my blog, please comment your measurements below. I will make a pattern closest to your measurements. I can also create the pattern in other paper sizes (A0 to A4, Letter, Tabloid), so please inform me if you need them.

Not sure how to print and cut the patterns? Check the guide here.

Again, happy sewing! I hope to see your masterpiece!
XOXO
Tiên the Little Sewist

Download links for the basic dress block:

Check for your size in the Size Chart before downloading.